|
In this article, I’ll introduce the touchscreen
API by walking through a modification of HelloCone that makes the cone
point toward the user’s finger. You’ll need to change the name of the app
from HelloCone to TouchCone, since the user now touches the cone instead
of merely greeting it. To do this, make a copy of the project folder in
Finder, and name the new folder TouchCone. Next, open
the Xcode project (it will still have the old name), and select
Project→Rename. Change the name to
TouchCone, and click Rename. Apple’s multitouch API is actually much richer
than what we need to expose through our
IRenderingEngine interface. For example, Apple’s API
supports the concept of cancellation, which is useful
to robustly handle situations such as an interruption from a phone call.
For our purposes, a simplified interface to the rendering engine is
sufficient. In fact, we don’t even need to accept multiple touches
simultaneously; the touch handler methods can simply take a single
coordinate. For starters, let’s add three methods to
IRenderingEngine for “finger up” (the end of a touch),
“finger down” (the beginning of a touch), and “finger move.” Coordinates
are passed to these methods using the ivec2 type from
the vector library . Example 1 shows the modifications to
IRenderingEngine.hpp (new lines are in bold). Example 1. IRenderingEngine interface for TouchCone#include "Vector.hpp"
...
struct IRenderingEngine {
virtual void Initialize(int width, int height) = 0;
virtual void Render() const = 0;
virtual void UpdateAnimation(float timeStep) = 0;
virtual void OnRotate(DeviceOrientation newOrientation) = 0;
virtual void OnFingerUp(ivec2 location) = 0;
virtual void OnFingerDown(ivec2 location) = 0;
virtual void OnFingerMove(ivec2 oldLocation, ivec2 newLocation) = 0;
virtual ~IRenderingEngine() {}
};
|
The iPhone notifies your view of touch events
by calling methods on your UIView class, which you can
then override. The three methods we’re interested in overriding are
touchesBegan, touchedEnded, and
touchesMoved. Open GLView.mm, and
implement these methods by simply passing on the coordinates to the
rendering engine: - (void) touchesBegan: (NSSet*) touches withEvent: (UIEvent*) event
{
UITouch* touch = [touches anyObject];
CGPoint location = [touch locationInView: self];
m_renderingEngine->OnFingerDown(ivec2(location.x, location.y));
}
- (void) touchesEnded: (NSSet*) touches withEvent: (UIEvent*) event
{
UITouch* touch = [touches anyObject];
CGPoint location = [touch locationInView: self];
m_renderingEngine->OnFingerUp(ivec2(location.x, location.y));
}
- (void) touchesMoved: (NSSet*) touches withEvent: (UIEvent*) event
{
UITouch* touch = [touches anyObject];
CGPoint previous = [touch previousLocationInView: self];
CGPoint current = [touch locationInView: self];
m_renderingEngine->OnFingerMove(ivec2(previous.x, previous.y),
ivec2(current.x, current.y));
}
The RenderingEngine1
implementation (Example 2) is similar
to HelloCone, but the OnRotate and
UpdateAnimation methods become empty. Example 2 also notifies the user that the
cone is active by using glScalef to enlarge the
geometry while the user is touching the screen. New and changed lines in
the class declaration are shown in bold. Note that we’re removing the
Animation structure. Example 2. RenderingEngine1.cpp in TouchConeclass RenderingEngine1 : public IRenderingEngine {
public:
RenderingEngine1();
void Initialize(int width, int height);
void Render() const;
void UpdateAnimation(float timeStep) {}
void OnRotate(DeviceOrientation newOrientation) {}
void OnFingerUp(ivec2 location);
void OnFingerDown(ivec2 location);
void OnFingerMove(ivec2 oldLocation, ivec2 newLocation);
private:
vector<Vertex> m_cone;
vector<Vertex> m_disk;
GLfloat m_rotationAngle;
GLfloat m_scale;
ivec2 m_pivotPoint;
GLuint m_framebuffer;
GLuint m_colorRenderbuffer;
GLuint m_depthRenderbuffer;
};
RenderingEngine1::RenderingEngine1() : m_rotationAngle(0), m_scale(1)
{
glGenRenderbuffersOES(1, &m_colorRenderbuffer);
glBindRenderbufferOES(GL_RENDERBUFFER_OES, m_colorRenderbuffer);
}
void RenderingEngine1::Initialize(int width, int height)
{
m_pivotPoint = ivec2(width / 2, height / 2);
...
}
void RenderingEngine1::Render() const
{
glClearColor(0.5f, 0.5f, 0.5f, 1);
glClear(GL_COLOR_BUFFER_BIT | GL_DEPTH_BUFFER_BIT);
glPushMatrix();
glEnableClientState(GL_VERTEX_ARRAY);
glEnableClientState(GL_COLOR_ARRAY);
glRotatef(m_rotationAngle, 0, 0, 1); // Replaces call to rotation()
glScalef(m_scale, m_scale, m_scale); // Replaces call to glMultMatrixf()
// Draw the cone.
glVertexPointer(3, GL_FLOAT, sizeof(Vertex), &m_cone[0].Position.x);
glColorPointer(4, GL_FLOAT, sizeof(Vertex), &m_cone[0].Color.x);
glDrawArrays(GL_TRIANGLE_STRIP, 0, m_cone.size());
// Draw the disk that caps off the base of the cone.
glVertexPointer(3, GL_FLOAT, sizeof(Vertex), &m_disk[0].Position.x);
glColorPointer(4, GL_FLOAT, sizeof(Vertex), &m_disk[0].Color.x);
glDrawArrays(GL_TRIANGLE_FAN, 0, m_disk.size());
glDisableClientState(GL_VERTEX_ARRAY);
glDisableClientState(GL_COLOR_ARRAY);
glPopMatrix();
}
void RenderingEngine1::OnFingerUp(ivec2 location)
{
m_scale = 1.0f;
}
void RenderingEngine1::OnFingerDown(ivec2 location)
{
m_scale = 1.5f;
OnFingerMove(location, location);
}
void RenderingEngine1::OnFingerMove(ivec2 previous, ivec2 location)
{
vec2 direction = vec2(location - m_pivotPoint).Normalized();
// Flip the y-axis because pixel coords increase toward the bottom.
direction.y = -direction.y;
m_rotationAngle = std::acos(direction.y) * 180.0f / 3.14159f;
if (direction.x > 0)
m_rotationAngle = -m_rotationAngle;
}
|
The only bit of code in Example 2 that might need some extra
explanation is the OnFingerMove method; it uses some
trigonometric trickery to compute the angle of rotation. The best way to
explain this is with a diagram, as shown in Figure 1. Recall from high-school trig that the cosine is
“adjacent over hypotenuse.” We normalized the direction vector, so we know
the hypotenuse length is exactly one. Since cos(θ)=y,
then acos(y)=θ. If the direction vector points toward
the right of the screen, then the rotation angle should be reversed, as
illustrated on the right. This is because rotation angles are
counterclockwise in our coordinate system. 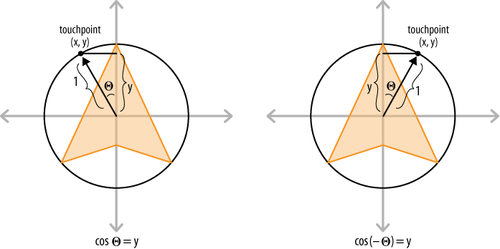
Note that OnFingerMove flips
the y-axis. The pixel-space coordinates that come from
UIView have the origin at the upper-left corner of the
screen, with +Y pointing downward, while OpenGL (and mathematicians)
prefer to have the origin at the center, with +Y pointing
upward. That’s it! The 1.1 ES version of the Touch Cone
app is now functionally complete. If you want to compile and run at this
point, don’t forget to turn on the ForceES1GLView.mm. switch at
the top of Let’s move on to the ES 2.0 renderer. Open
RenderingEngine2.cpp, and make the changes shown in
bold in Example 3. Most of these
changes are carried over from our ES 1.1 changes, with some minor
differences in the Render method. Example 3. RenderingEngine2.cpp in TouchConeclass RenderingEngine2 : public IRenderingEngine {
public:
RenderingEngine2();
void Initialize(int width, int height);
void Render() const;
void UpdateAnimation(float timeStep) {}
void OnRotate(DeviceOrientation newOrientation) {}
void OnFingerUp(ivec2 location);
void OnFingerDown(ivec2 location);
void OnFingerMove(ivec2 oldLocation, ivec2 newLocation);
private:
...
GLfloat m_rotationAngle;
GLfloat m_scale;
ivec2 m_pivotPoint;
};
RenderingEngine2::RenderingEngine2() : m_rotationAngle(0), m_scale(1)
{
glGenRenderbuffersOES(1, &m_colorRenderbuffer);
glBindRenderbufferOES(GL_RENDERBUFFER_OES, m_colorRenderbuffer);
}
void RenderingEngine2::Initialize(int width, int height)
{
m_pivotPoint = ivec2(width / 2, height / 2);
...
}
void RenderingEngine2::Render() const
{
GLuint positionSlot = glGetAttribLocation(m_simpleProgram,
"Position");
GLuint colorSlot = glGetAttribLocation(m_simpleProgram,
"SourceColor");
glClearColor(0.5f, 0.5f, 0.5f, 1);
glClear(GL_COLOR_BUFFER_BIT | GL_DEPTH_BUFFER_BIT);
glEnableVertexAttribArray(positionSlot);
glEnableVertexAttribArray(colorSlot);
mat4 rotation = mat4::Rotate(m_rotationAngle);
mat4 scale = mat4::Scale(m_scale);
mat4 translation = mat4::Translate(0, 0, -7);
// Set the model-view matrix.
GLint modelviewUniform = glGetUniformLocation(m_simpleProgram,
"Modelview");
mat4 modelviewMatrix = scale * rotation * translation;
glUniformMatrix4fv(modelviewUniform, 1, 0, modelviewMatrix.Pointer());
// Draw the cone.
{
GLsizei stride = sizeof(Vertex);
const GLvoid* pCoords = &m_cone[0].Position.x;
const GLvoid* pColors = &m_cone[0].Color.x;
glVertexAttribPointer(positionSlot, 3, GL_FLOAT,
GL_FALSE, stride, pCoords);
glVertexAttribPointer(colorSlot, 4, GL_FLOAT,
GL_FALSE, stride, pColors);
glDrawArrays(GL_TRIANGLE_STRIP, 0, m_cone.size());
}
// Draw the disk that caps off the base of the cone.
{
GLsizei stride = sizeof(Vertex);
const GLvoid* pCoords = &m_disk[0].Position.x;
const GLvoid* pColors = &m_disk[0].Color.x;
glVertexAttribPointer(positionSlot, 3, GL_FLOAT,
GL_FALSE, stride, pCoords);
glVertexAttribPointer(colorSlot, 4, GL_FLOAT,
GL_FALSE, stride, pColors);
glDrawArrays(GL_TRIANGLE_FAN, 0, m_disk.size());
}
glDisableVertexAttribArray(positionSlot);
glDisableVertexAttribArray(colorSlot);
}
// See Example 3-2 for OnFingerUp, OnFingerDown, and OnFingerMove.
...
|
You can now turn off the
ForceES1 switch in GLView.mm and
build and run TouchCone on any Apple device. In the following sections,
we’ll continue making improvements to the app, focusing on how to
efficiently describe the cone geometry.
|